
What even is intaglio?
First things first. This is my personal and continuous learning and improvement in my intaglio skills as SouthSeaEyes Printmaker. And in this particular writing, I speak of my present snapshot chapter of Drypoint intaglio.
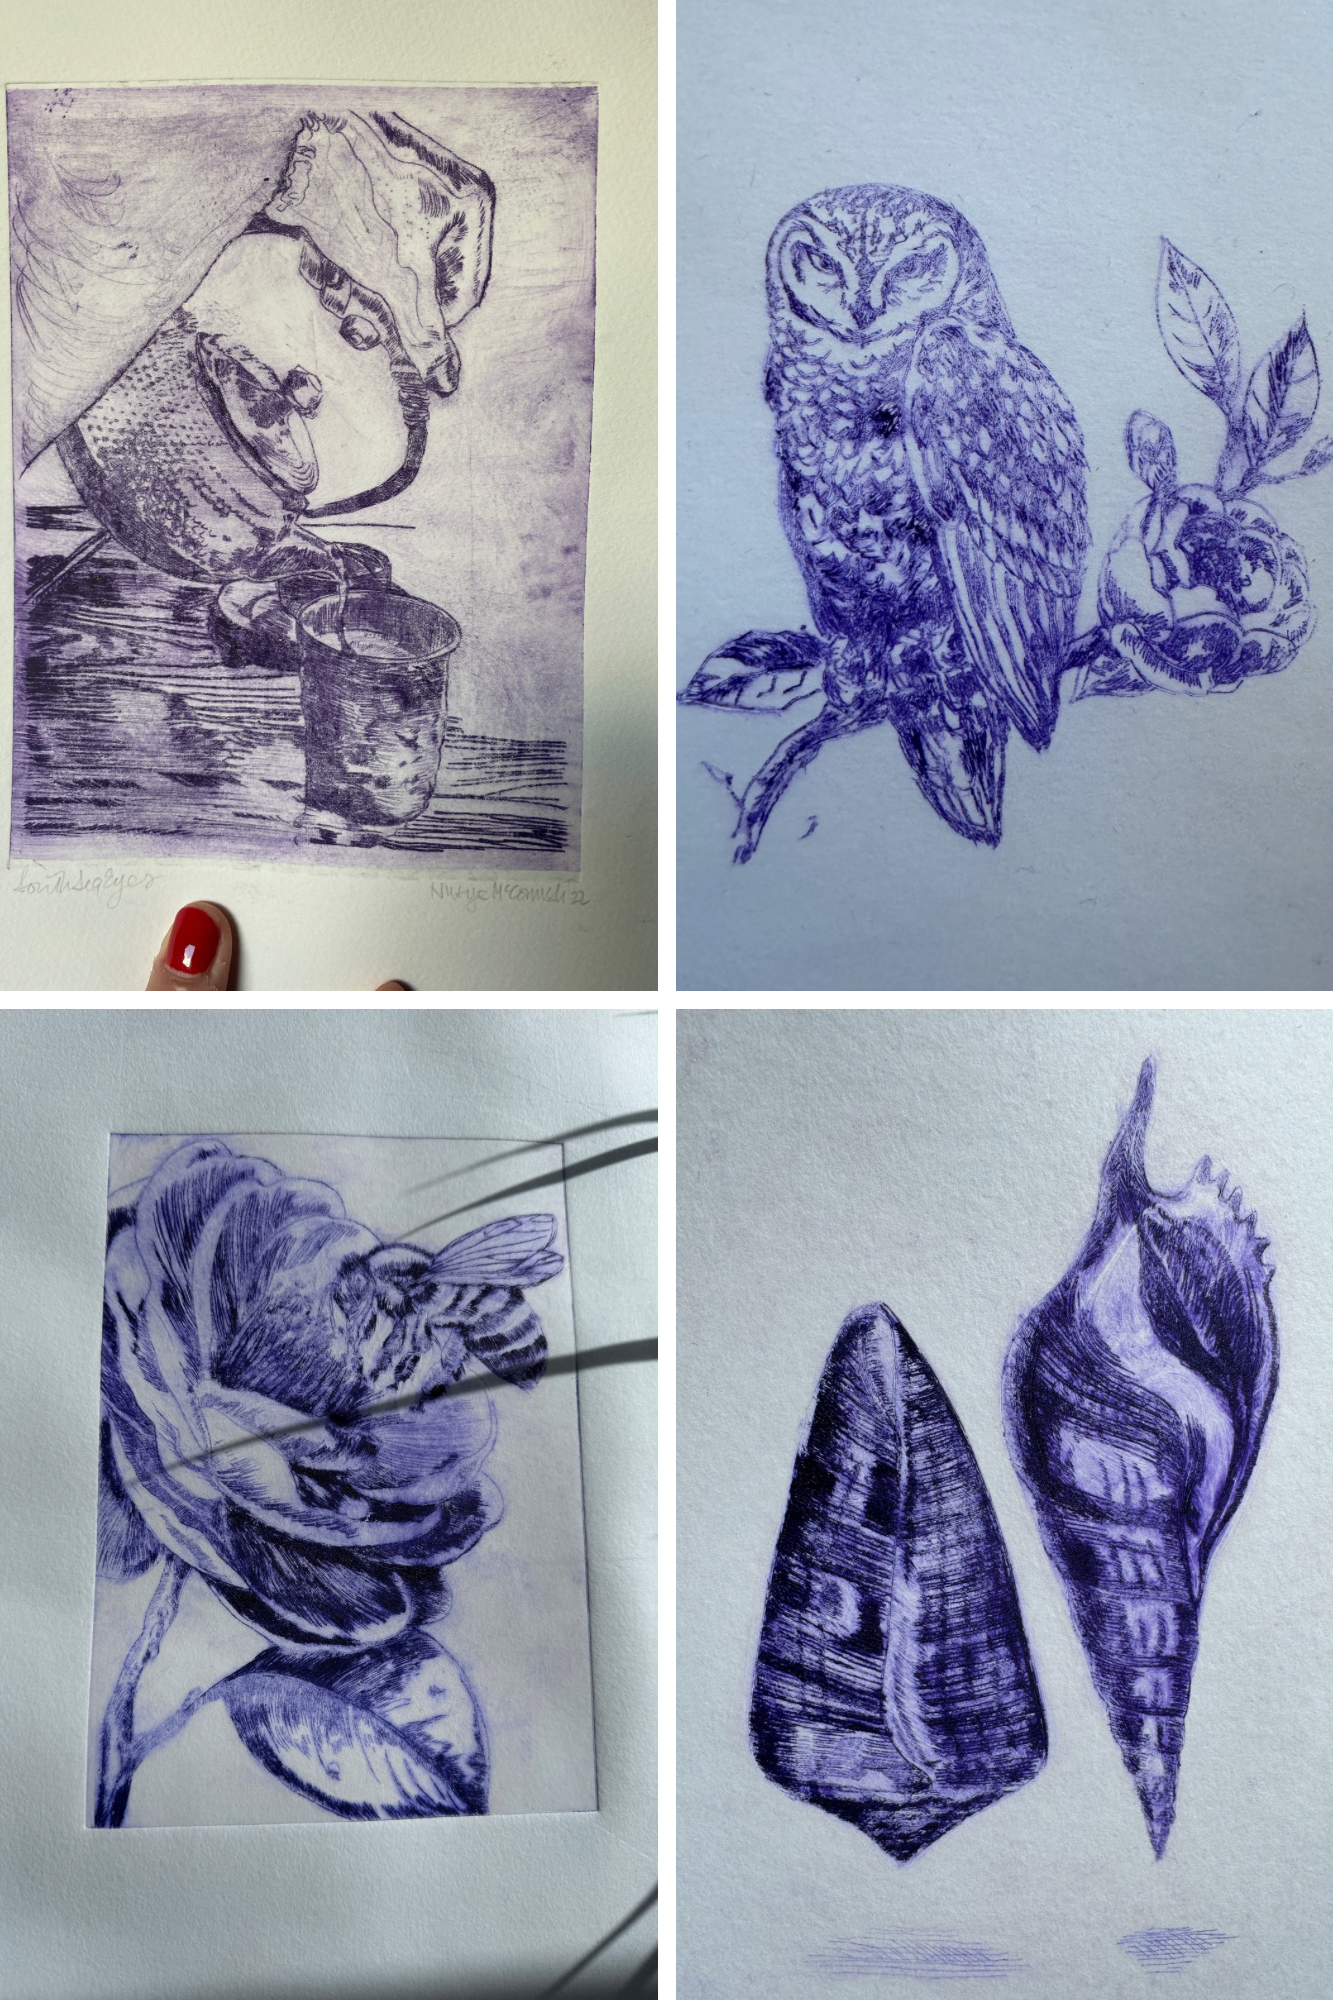
Drypoint is a subset of intaglio printmaking. It involves incising an image onto a plate with a hard-pointed needle.
The process begins by engraving/scratching an image onto a plate of metal or acrylic, using a sharp needle to create lines and textures. These incised lines hold the intaglio ink, which is meticulously pushed (read: rubbed into, by a series of strategically scrunched-up, increasingly finer cloths) into the plate’s recesses. The surface is then wiped clean, leaving ink only in the grooves and around the burrs—tiny, raised edges produced during the engraving process. When a damp sheet of paper is placed over the plate and run through a high-pressure printing press, the paper absorbs the ink from these recesses, capturing the image with rich, velvety lines and a characteristic furring effect created by the burrs. Unlike lino relief printing, which transfers ink from the raised surface of the plate, intaglio printing relies on the paper’s dampness to draw ink from the plate’s incised lines, resulting in a unique depth and texture that defines the drypoint technique. Modern drypoint artists have expanded beyond traditional copper plates, using materials like zinc and plexiglass, perspex, even; which offer different textural qualities and are more accessible both on availability as well as on price points.
Whilst I enjoy working on copper and zinc plates, I am presently using acrylic plates in my workings. This makes my practice more accessible and cost-effective. After all, practice means allowing for mistakes and learning from it. The use of acrylics allows for my meanderings from stringent productive modes of thinking – and enter the modes of play. That is to say, I continue to ask, “what happens if I do this?” – whilst mark-making on the plate.


My steps of making a drypoint as follows:
Prepare the Plate: Select a plate (commonly copper, though zinc is a fun, more malleable metal, allows for quick scratch marks) and in my current observations, 1mm thick perspex plate is used; clean its surface to remove any gubbins/impurities. Eco-friendly thinking also means tryouts of using the inside part of a cider can (see strongbow cider inner metal intaglio works in below series of pictures).


Draw the Image: Use a sharp drypoint needle (or, yes, needle-like tool) to incise the design directly onto the plate. The drawing creates a raised edge, known as the burr. When playful and relaxed, I scratch away with minimal planning. This helps me mentally record what scratches make what type of marks on paper when printed.
Prep the Paper: Soak the printing paper in water, place it on a clean upright surface to let drip, then blot it to remove excess moisture. My practice is to leave the paper onto the bathroom mirror to drip excess water, then sandwich the paper between two large & dry blotting paper (I got mine from Jackson’s Art). For soaking larger sized papers, I have been known to shallow-fill the clean bath tub for the paper soak. Otherwise a clean kitchen sink is absolutely doable. The optimal soaking time varies depending on the type of paper. The weightier the paper, the smidge longer it needs to soak. Current general Rule of thumb is 5-10min for 220gsm cotton-heavy paper like Bread&Butter from John Purcell Paper. Large paper sizes requires me to use a free-standing A1 sized tempered glass as additional drip-off surface area inside a large-diameter garden tub.
About Paper-soaking: this helps the paper become pliable, which makes it more loyal to the grooves and marks on the plate’s surface. The softened fibres of the paper can absorb and embed the ink into the paper; The water contained in the fibres helps ink adhesion, so the ink penetrates and bond onto the paper surface. Here’s the sciency bit: the paper’s dampness enhances its surface energy, enhances its secondary binding forces between the ink and the paper. I used to think this is a form of capillarisation. But maybe more van der Waal’s forces, for overall adhesion. Someone more recently learned in chemistry might be able to confirm this in the comment section (my Chemy A-levels was last century and my brain has archived this knowledge).
Apply Ink: Use a suitable ink for drypoint, such as Cranfield Safewash or AKUA inks, which provide good consistency. Avoid inks that are too loose or too stiff; you can adjust ink stiffness with additives like magnesium carbonate. Spread a layer of ink, use mount board offcuts, or rubber spatulas, or inking knife, over the entire plate, ensuring it fills the incised lines and the burr.
Wipe the Plate: Carefully wipe the surface of the plate with a mull / starched tarlatan / discarded denim cloth, carefully leaving ink only in the incised areas – and gently taking care of not flattening the intricate burrs on the surface, as these burrs are relevant to creating crisp ink transfers onto paper. This step requires precision and multiple approaches to maintain the quality of the image. Further down the wiping stage, with most of the excess ink wiped off, I may use newspaper print paper or glossy telephone directory paper to wipe the plate – using it as a flat wipe-off, not as crumpled paper (crumpled paper provides too many angled corners which may scratch the plate).
Print: Place the inked plate on the press, lay the damp paper on top, and run it through the Gunning Ironbridge press. The pressure transfers the ink from the plate to the paper. Alternative methods include using a hand-press Sláma Press with extra weights. This works well for when one needs tonal striations effect for the finished prints.
Reveal the Print: Carefully lift the paper from the plate to reveal the print. Allow it to dry completely before handling. As a sidenote, I tend to number the prints in sequence to track changes in quality over time, as the burrs will wear down with each print. With each perspex, so far I’ve achieved 3-5 good, crisp prints. The cider can experiments lasts 2 maximum crisp prints. Single-digit editioning lines.
A labour-intensive technique, drypoint showcase intricate details and expressive line work; these pieces reflect both traditional methods and contemporary influences. This may well be testament to my relentless pursuit of balancing subtle nuances and textural depth in each intaglio print.
My childhood fascination of MC Escher’s mathematically-clever works in mezzotint, woodcuts and lithography has indirectly influenced my current printmaking thoughts of lines and curves. Kathë Kollwitz’s 1910 work of Tod, Frau und Kind, too, has impressed upon me the impact of using graphic lines to distinctly express emotional impact, and using art as socially relevant commentary. Add to these weighty figures is Albrecht Dürer’s etching and engraving works, have been a primary cause for this drypoint obsession.
This exploration of intaglio printmaking shows that this technique remains a vital and expressive medium within the printmaking as well as the wider art world. The intricate processes of intaglio, including drypoint, offer artists a unique opportunity to create detailed and textured prints that convey depth and emotion. As a printmaker artist under the moniker SouthSeaEyes, my journey into mastering drypoint techniques is driven by a passion for expanding my artistic repertoire and sharing the rich heritage of intaglio with a broader audience. The tactile nature of drypoint, with its characteristic velvety lines and expressive potential, is particularly appealing. To further my skills and knowledge, I hope to apply for Arts Council England funding that will enable me to deepen my understanding and skills of this craft. Such support would provide access to specialized workshops, materials, and mentorship from experienced artists like Catherine Greenwood, fostering my growth and allowing me to contribute more significantly to the community. By embracing both traditional methods and contemporary innovations, I aim to create works that resonate with viewers and preserve the legacy of intaglio printmaking for future generations. This endeavour not only enriches my personal artistic journey but also enhances the cultural tapestry of the arts.
Thinking in printmaking,
Nusye
- Nine Months In
 Personal essay of grief writing about waking into loss. For those in traumatic bereavement who find the body remembers before the mind catches up.
 - First Winter
 Field notes from traumatic bereavement: documenting grief’s administrative violence, temporal mechanisms, and survival at 8-9 months post-loss.
 - Grief on the Body: Embodied Loss and Creative Practice as Record
 This essay documents grief as a lived bodily state and considers creative practice not as recovery or remedy, but as record: work made alongside life, under altered conditions.
 - First Christmas
 When your husband was Christmas, you inherit the Turkey Problem. Navigating the first Christmas bereaved – the unfathomable grief, the planning, picking up broken pieces.
 - Grief’s Imprint on the Body: An Auto-Ethnographic Reflection
 A reflective, research-informed exploration of how sudden bereavement reshapes the body, from immune vulnerability to hypervigilance — blending poetry, personal narrative and academic insight.